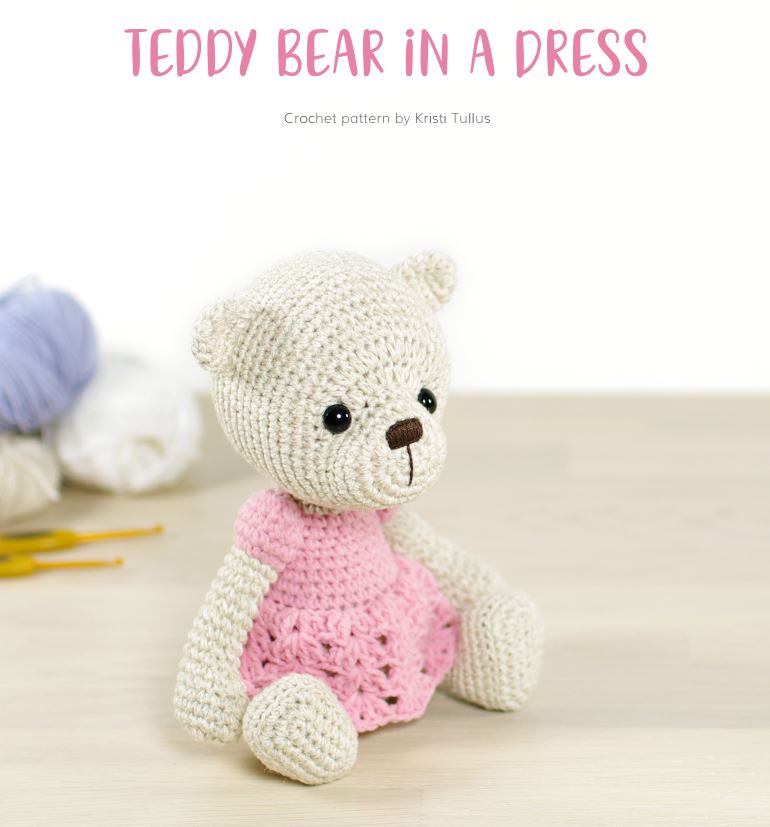
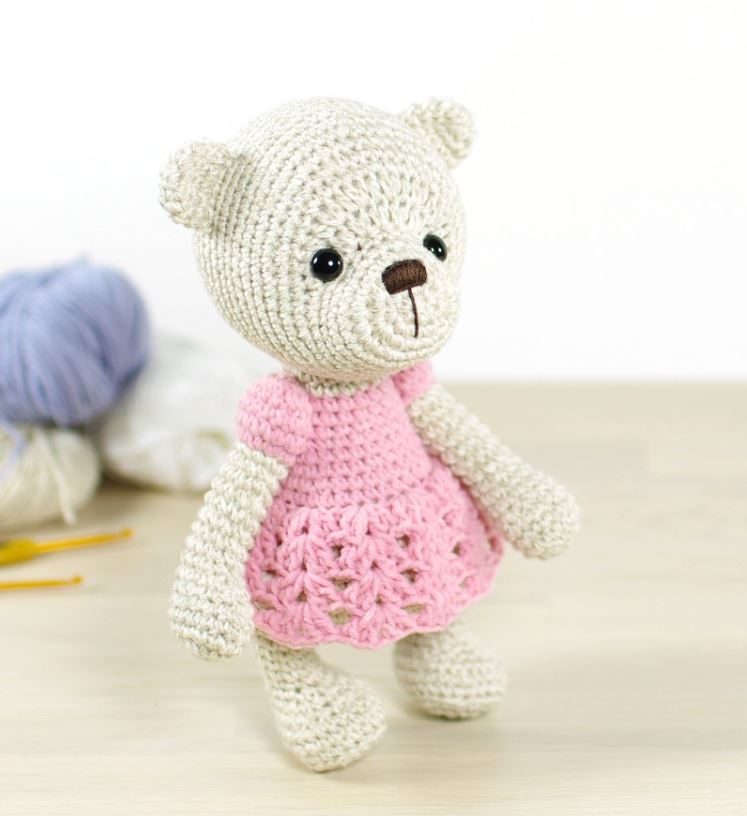
Teddy Bear in a Dress
Crochet pattern by Kristi Tullus
Size
19.5cm (7 2/3″), when crocheted with DK weight cotton
and linen blend and a 2,25mm crochet hook.
Skills required
Crocheting in spiral, crocheting in rounds, chain, slip,
single, half double and double crochet stitch, increasing
and decreasing.
Difficulty
3. Intermediate – includes some less common crochet
techniques, color changes and simple shaping.
Materials & Tools
• Yarn. I used DK weight cotton and linen blend, 112m=50g (122yd=50g) / 8 ply / 11 wpi. You will
need about 55g of beige and 25g of pink yarn.
• 2,50 – 3,00mm crochet hook (US size 1/B – 3/D).
• Polyester fiberfill, wool, wadding for stuffing.
• 9mm (3/8″) safety eyes or buttons, beads, felt etc.
• Two 20mm (4/5”) and two 15mm (3/5”) plastic doll joints or safety eyes or buttons and thread.
• Black or dark brown cotton embroidery floss.
• Sewing pins, yarn needle, scissors, stitch marker.
Choosing joints
Tip! You can use plastic doll joints, safety eyes, cotter pin joints, buttons and thread or even just thread
to attach the arms and legs. My favorite are plastic doll joints – they are easy to install, durable and
washable. Buttons and thread will work great as well, if you can’t get your hands on any joints.
Plastic doll joints
1. Plastic doll joints come in three
pieces – disk with a post, washer
and a fastener.
2. Disk with a post is placed inside
the limbs, pushing the post through
the fabric.
3. And then locked in place inside
the body

Button and thread joints
Tip! Make sure you use very strong thread to attach the limbs – it will have to endure quite a bit of
tension and can be a bit difficult to mend, should it break. I have found cotton embroidery floss, nylon
sewing thread (doubled or tripled) or fishing line work really well.
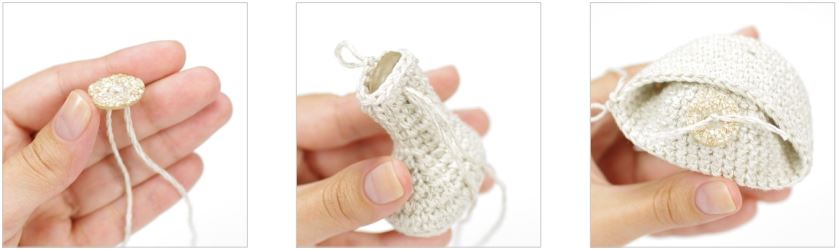
1. Cut a length of yarn and draw it
through the holes in the button.
2. Place the button inside a limb,
drawing the yarn tails through the
fabric.
3. Place the other button inside the
body, draw the yarn tails through
the holes and knot them together.
Abbreviations
• st(s) = stitch(es).
• mr, sc n = crochet n (number) single crochet stitches into the adjustable loop (see page 14).
• sl st = slip stitch.
• ch = chain stitch.
• sc = single crochet stitch (double crochet stitch in UK and Australia).
• hdc = half double crochet stitch (half triple crochet stitch in UK and Australia).
• dc = double crochet stitch (triple crochet stitch in UK and Australia).
• sc (or ch, hdc etc.) n = crochet n single crochet stitches (or ch, hdc etc.), one in each stitch.
• dc 2 + ch + dc 2 = crochet all stitches in the same stitch.
• inc = increase – crochet two single crochet stitches in the same stitch.
• inc3 = double increase – crochet three single crochet stitches in the same stitch.
• hdc-inc = half double crochet increase – crochet two half double crochet stitches in the same stitch.
• dec = decrease – crochet two stitches together using the invisible decrease method (see page 16).
• (sc 4, inc) x n = repeat the pattern between parentheses n times.
• (36) = number of stitches in a round after finishing round.
Notes
• Work in a continuous spiral, do not join rounds or turn your work, unless instructed otherwise in the
pattern.
• Use a stitch marker or a piece of yarn to mark the end or the beginning of a round.
• Work all stitches in both loops, unless instructed otherwise in the pattern.
Copyright Info
Copyright © 2014 TÜ Spire. All rights reserved. Contents of this document may not be copied,
reproduced, altered, published or distributed in any way. You may sell finished products made with
this pattern, I would appreciate a credit as the designer (Kristi Tullus, kristitullus.com).
Head
With beige yarn:
| 1: mr, sc 6 2: inc x 6 3: sc 2, inc3 x 2, sc 4, inc3 x 2, sc 2 4: sc 4, inc x 3, sc 7, inc x 3, sc 3 5-6: sc in each st 7: sc 10, hdc-inc x 7, sc 9 8: inc, sc 7, inc, sc, hdc 2, hdc-inc, (hdc, hdc-inc) x 5, hdc 2, sc, inc, sc 6 9: sc 9, inc, sc 7, inc, (sc 4, inc) x 2, sc 8, inc, sc 5 10: sc 15, inc, (sc 6, inc) x 3, sc 10 11: sc, inc, sc 19, inc, sc 12, inc, sc 16 12: sc 28, inc, sc 2, inc, sc 22 |
(6) (12) (20) (26) (26) (33) (42) |
| (47) | |
| (51) (54) (56) |
Attach safety toy eyes between rows 7 and 8, leaving
12 stitches (count 11 holes) between them. Stuff the
muzzle and embroider the nose.
| 13-21: sc in each st 22: (sc 12, dec) x 4 23: sc 5, dec, (sc 11, dec) x 3, sc 6 |
(56) (52) (48) |
Start stuffing the head. Keep adding a bit of fiberfill
after every few rounds, stuffing the head firmly.
| 24: (sc 10, dec) x 4 25: sc 4, dec, (sc 9, dec) x 3, sc 5 26: (sc 8, dec) x 4 27: sc, dec, (sc 4, dec) x 5, sc 3 28: (sc 3, dec) x 6 29: (dec, sc 2) x 6 30: (sc, dec) x 6 31: dec x 6 |
(44) (40) (36) (30) (24) (18) (12) (6) |
Finish stuffing. Cut the yarn, leaving a long yarn tail,
and close the opening (see page 8).
Ears (make 2)
With beige yarn:
| 1: mr, sc 6 2: inc x 6 3-5: sc in each st |
(6) (12) (12) |
Sl st in next stitch. Cut the yarn, leaving a long yarn
tail for sewing, and fasten off. Do not stuff the ears.
Legs (make 2)
With beige yarn:
1: ch 7, 2 sc in second ch from hook, sc 4,
4 sc in first ch
Rotate and work on other side of beginning chain.
sc 4, 2 sc in last ch (16)
Continue working in spiral.
| 2: inc, sc 5, inc3, sc 2, inc3, sc 5, inc 3: inc3, sc 7, inc3, sc 4, inc3, sc 8 |
(22) (28) |
Work in back loops only on round 4!
| 4-5: sc in each st 6: sc, dec, sc 25 7: sc 8, dec x 3, sc, dec x 3, sc 6 8: sc 7, dec x 2, sc, dec x 2, sc 5 9: sc 6, dec x 3, sc 5 10: sc 7, dec, sc 5 |
(28) (27) (21) (17) (14) (13) |
Stuff the feet firmly. Keep adding a bit of fiberfill after
every few rounds, stuffing the legs firmly.
11-17: sc in each st (13)
On the left leg, crochet one sc in next 7 stitches. Count
the last sc as the end of the round from now on.
Attach the disk with a stem between rows 16 and 17,
placing it so the stem is facing straight towards the
body (see page 9).
| 18: dec, sc 6, dec, sc 3 19: sc, dec x 5 |
(11) (6) |
Finish stuffing. Cut the yarn, leaving a long yarn tail,
and close the opening (see page 8).
Right arm
With beige yarn:
| 1: mr, sc 6 2: (inc3 x 2, sc) x 2 3: sc 3, inc, sc 6, inc, sc 3 4-5: sc in each st 6: sc 2, dec x 2, sc 6, inc, sc 3 |
(6) (14) (16) (16) (15) |
| 7: sc 2, dec, sc 6, inc, sc 4 8: sc, dec x 2, sc 10 9: sc, dec, sc 10 |
(15) (13) (12) |
Stuff the hands firmly. Keep adding a bit of fiberfill
after every few rounds, stuffing the arms firmly.
| 10-13: sc in each st 14: sc, dec, sc 9 15-16: sc in each st |
(12) (11) (11) |
With pink yarn:
| 17: sc 2, inc x 4, sc 5 18-19: sc in each st |
(15) (15) |
Attach the disk with a stem between rows 18 and 19,
placing it so the stem is facing straight towards the
body (see page 9). Continue stuffing the arms.
| 20: sc 3, dec, sc 4, dec, sc 2, dec 21: dec x 6 |
(12) (6) |
Finish stuffing. Cut the yarn, leaving a long yarn tail,
and close the opening (see page 8).
Left arm
With beige yarn:
| 1: mr, sc 6 2: (inc3 x 2, sc) x 2 3: sc 3, inc, sc 6, inc, sc 3 4-5: sc in each st 6: sc 4, inc, sc 6, dec x 2, sc 7: sc 5, inc, sc 6, dec, sc |
(6) (14) (16) (16) (15) (15) |
Crochet one sc in next five stitches and count the last
sc as the end of the round from now on.
| 8: sc 7, dec x 2, sc 4 9: sc 7, dec, sc 4 |
(13) (12) |
Stuff the hands firmly. Keep adding a bit of fiberfill
after every few rounds, stuffing the arms firmly.
| 10-13: sc in each st 14: sc 7, dec, sc 3 15-16: sc in each st |
(12) (11) (11) |
With pink yarn:
| 17: sc 3, inc x 4, sc 4 18-19: sc in each st |
(15) (15) |
Attach the disk with a stem between rows 18 and 19,
placing it so the stem is facing straight towards the
body (see page 9). Continue stuffing the arms.
| 20: sc 3, dec, sc 4, dec, sc 2, dec 21: dec x 6 |
(12) (6) |
Finish stuffing. Cut the yarn, leaving a long yarn tail,
and close the opening (see page 8).
Body
With beige yarn:
| 1: mr, sc 6 2: inc x 6 3: (sc, inc) x 6 4: (inc, sc 2) x 6 5: (sc 3, inc) x 6 6: sc, inc, (sc 4, inc) x 5, sc 3 7: (sc 5, inc) x 6 8-14: sc in each st |
(6) (12) (18) (24) (30) (36) (42) (42) |
Turn the body so the last stitch of round 14 is facing
away from you (center of the back). Attach the legs to
either side of the body, between rows 8 and 9 (see
page 10).
Start stuffing the body. Keep adding a bit of fiberfill
after every few rounds, stuffing the body firmly.
15: sc 9, dec, sc 5, dec, sc 6, dec, sc 5, (38)
dec, sc 9
With pink yarn:
| 16: sc 18, dec, sc 16, dec 17: (sc 11, dec) x 2, sc 10 |
(36) (34) |
Crochet round 18 in back loops only.
| 18: sc in each st 19: sc 3, dec, (sc 7, dec) x 3, sc 2 20: (dec, sc 13) x 2 21: sc 7, dec, sc 11, dec, sc 6 |
(34) (30) (28) (26) |
| 22: sc 9, dec, sc 6, dec, sc 7 23: (dec, sc 10) x 2 24: sc 5, dec, sc 8, dec, sc 5 25: sc in each st |
(24) (22) (20) (20) |
With beige yarn:
| 26-27: sc in each st 28: sc 4, leave rest of the sts unworked |
(20) (20) |
Sl st in next stitch. Cut the yarn, leaving a long yarn
tail for sewing, and fasten off.
Attach the arms to either side of the body between
rows 23 and 24. Finish stuffing the body.
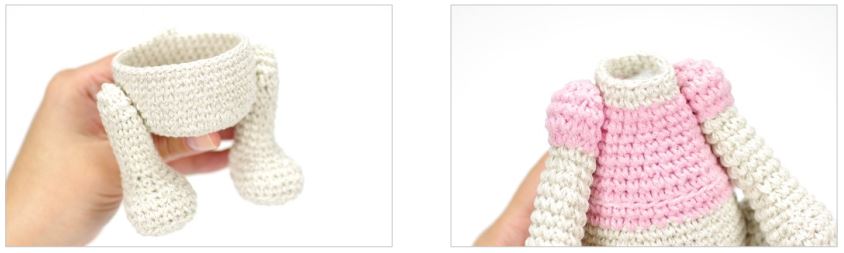
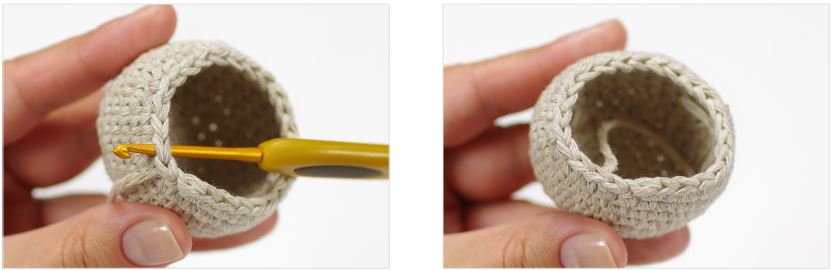
Skirt
Turn the body upside down and locate the row of
front loops left on round 18. Attach the yarn in the
first loop with a sl st and continue crocheting the first
round into the row of loops (see page 11).
Start each round with ch 3 and join with a sl st
through the 3rd ch. Do not count them as stitches.
With pink yarn:
| 1: ch 3, sk st, dc 2 + ch + dc 2, (sk 2 sts, dc 2 + ch + dc 2) x 10, sl st in 3rd ch 2-4: ch 3, (dc 2 + ch + dc 2 in ch sp) x 11, sl st in 3rd ch |
(55) |
| (55) |
Fasten off and weave in the yarn tail.
Head
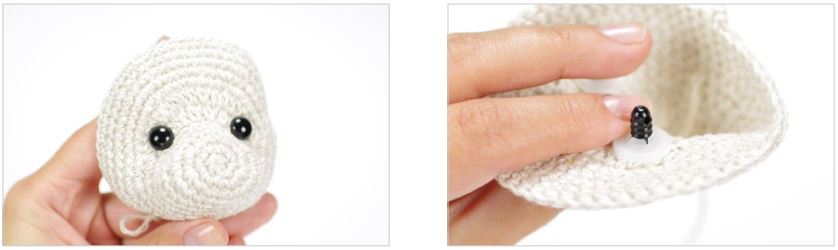
a) Attach safety eyes after finishing round 12.
1. Place the eyes between rows 7 and 8 leaving
12 stitches (count 11 holes) between them.
2. Make sure you are satisfied with the placement of
the eyes before pushing the washer into place.
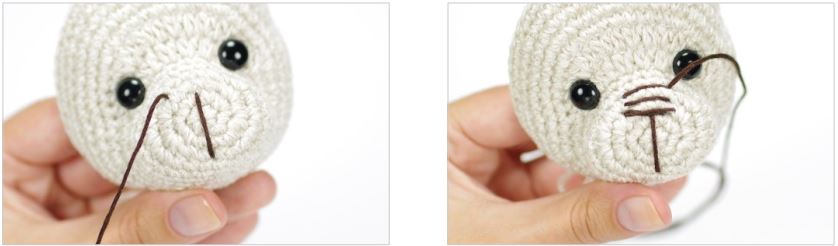
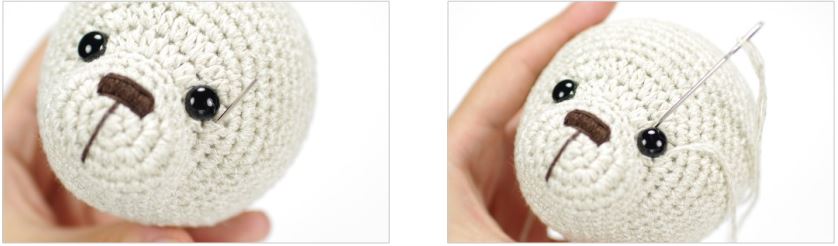
b) Embroider the nose.
1. Add a bit of stuffing to the muzzle. Insert the needle
from inside the head and bring it up just above the
second round. Make a long stitch going straight down.
2. Make a few stitches to mark the shape and size of
the nose.
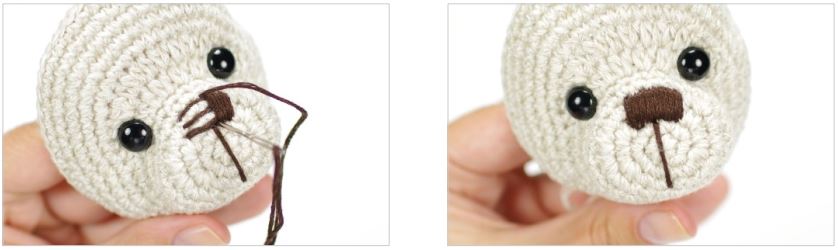
3. Make small vertical stitches to form the nose. Try to
make the stitches the same length and very close to
each other.
4. Just keep stitching until your nose is big enough.
5. Make long horizontal stitches along the top and bottom
of the nose, hiding any imperfections.
6. Knot the yarn ends together inside the head.
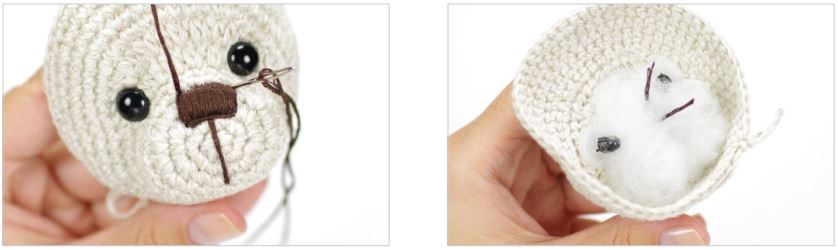
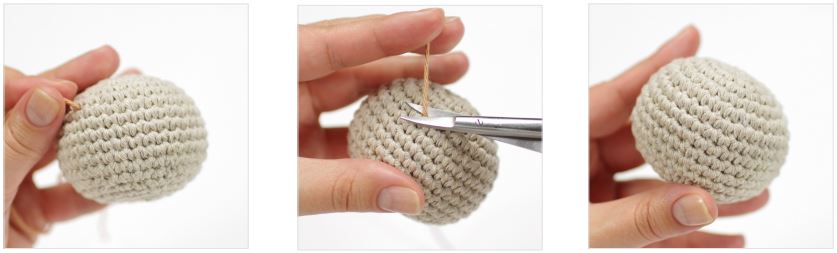
c) Finish the head and close the opening.
1. Cut the yarn, leaving a long tail, and fasten off. Thread
the yarn tail onto a yarn needle.
2. Pick up all the remaining stitches onto the yarn,
inserting the needle from the center and under the
front loop only and draw the yarn through.
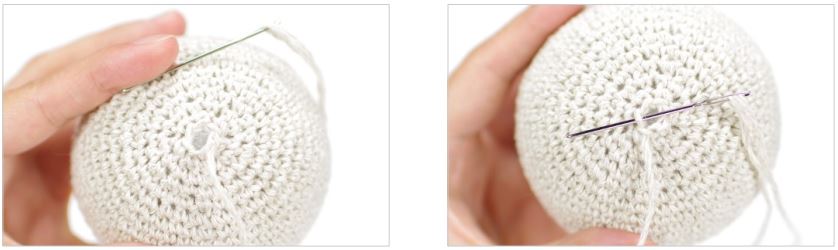
3. Grab the yarn tail and pull until the hole is tightly
closed.
4. Insert the needle through the center and bring the
yarn to the bottom of the head. Fasten and hide the
yarn tail.
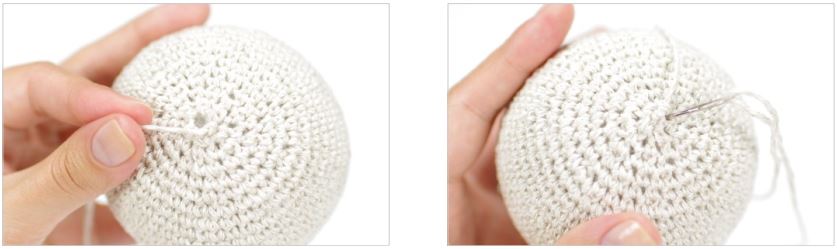
d) Use yarn to shape the head.
1. Insert the needle from the bottom of the head and
bring it up right next to the eye.
2. Go about half way around the eye and insert the
needle right next to the eye. Bring it to the bottom of
the head.
3. Grab the yarn tails and tug gently, pulling the eye in
just a bit.
4. Knot the yarn tails together. Do the same with the
other eye.

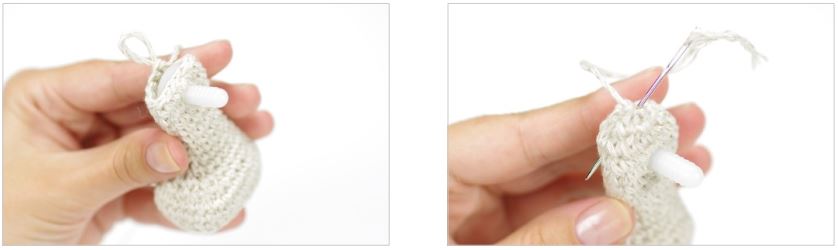
Arms & Legs
a) Place the joint or a button inside the arms and legs.
1. Place the disk inside the limb so the stem is facing
straight towards the body.
2. Finish the arms and legs and close the opening (see
page 8).
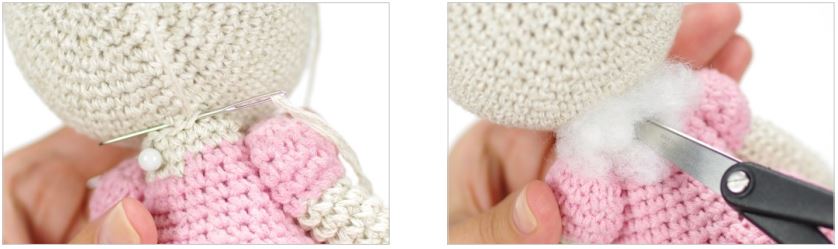
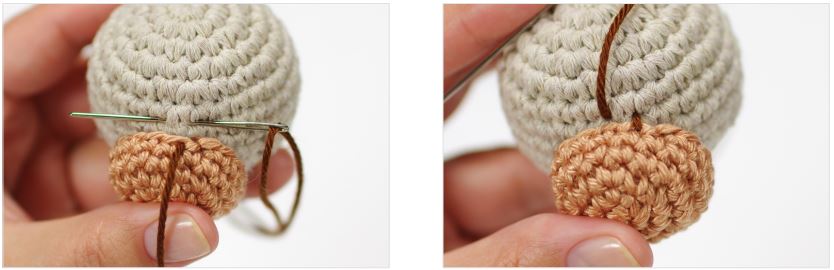
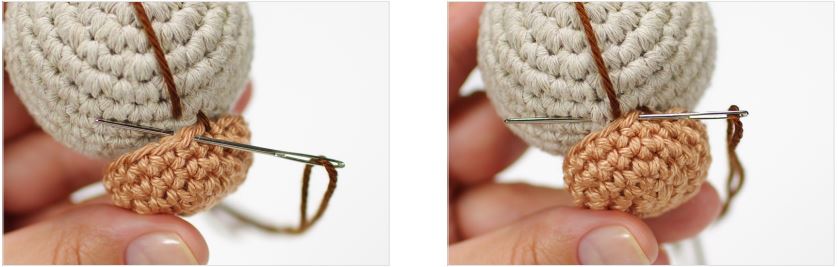
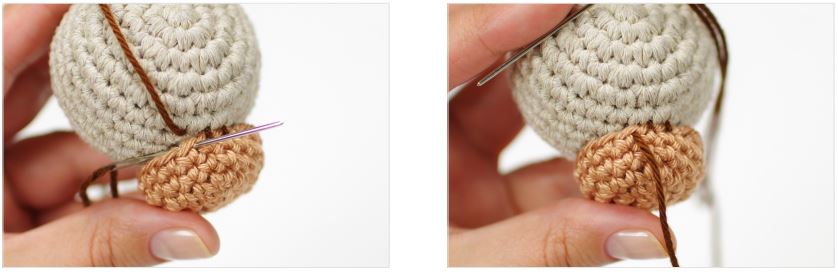
Assembling the bear
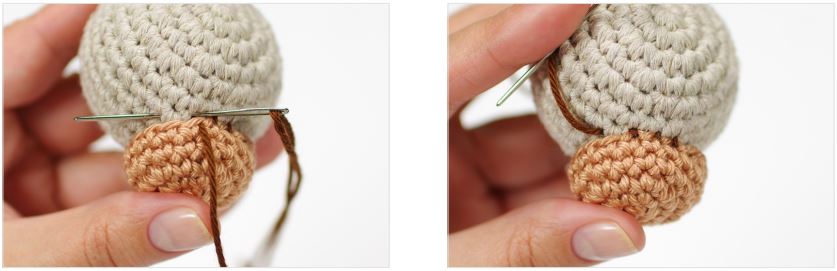
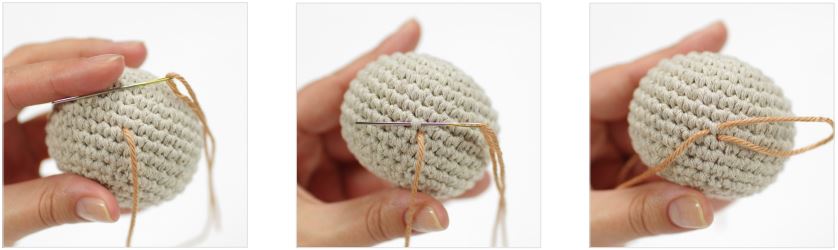
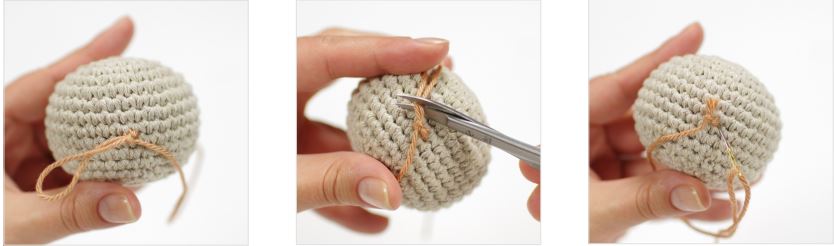
a) Sew the ears to the head.
1. Place the ears just behind round 17 of the head,
leaving 14 – 15 stitches between them.
2. Sew the ears to the head. Knot the yarn ends
together under the head

b) Finish the arms and legs. Start making the body and attach the limbs as you go.
1. Turn the body so the end of the round is at the center
of the back. Attach the legs to either side of the body
between rounds 8 and 9.
2. Finish the body. Attach the arms to either side of the
body between rounds 23 and 24.
c) Sew the head to the body
1. Sew the head to the body (see page 17 – 18), placing
it so the front edge is just behind round 13 of the head.
2. Add a bit more stuffing before closing the seam.
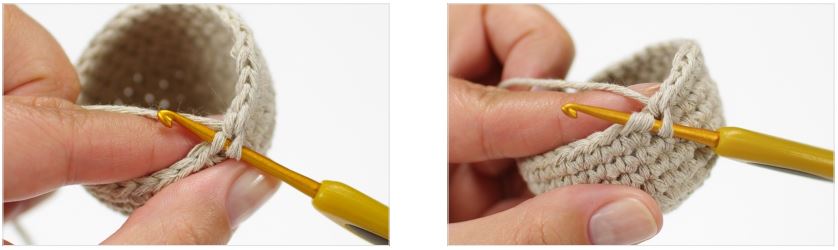
Skirt
a) Turn the body upside down and crochet the first round of the skirt in to the row of front loops.
Tip! You may find it easier to make the skirt before you attach the arms and stuff the body.
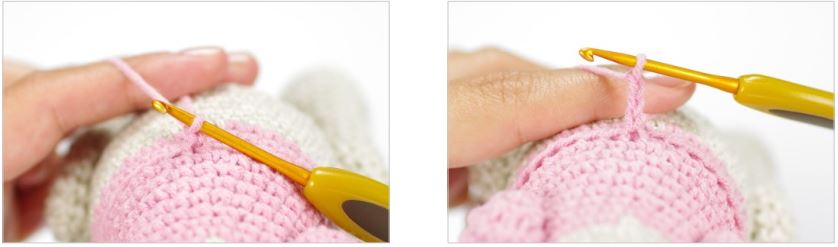
1. Take the body upside down and locate the row of front
loops left on round 18. Insert the hook under the first loop.
2. Yarn over and draw up a loop. Yarn over and draw
through the loop on the hook …

3. … attaching the yarn to the body.
4. Chain 3.
5. Skip the next stitch …
6. … and crochet dc 2 + ch + dc 2 all in the next stitch
after that.

7. Skip the next two stitches …
8. … and crochet dc 2 + ch + dc 2 all in the next stitch
after that.

9. Repeat steps 8 – 9 all around the body.
10. Slip stitch in the third chain to close the round.

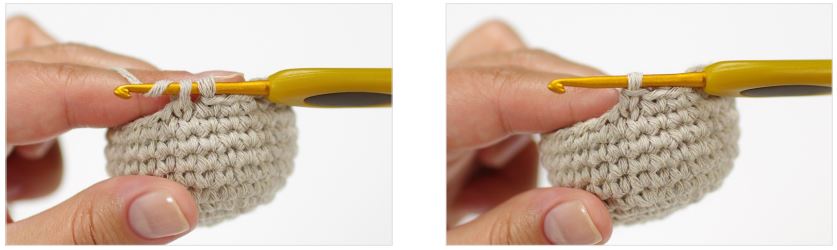
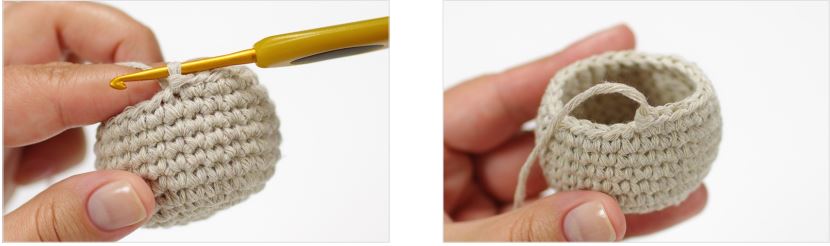
b) Crochet the next three rounds in the chain spaces of the previous round.
1. Start the next round with ch 3.
2. Insert your hook under the next chain between the
double crochet stitches.

3. … and crochet dc 2 + ch + dc 2 all in the chain space.
4. Repeat steps 2 – 3 all around the skirt, crocheting
dc 2 + ch + dc 2 in every chain space.

5. Slip stitch in the third chain to close the round.
6. Repeat for two more rounds. Fasten off and weave
in the yarn tail.

Amigurumi Essentials
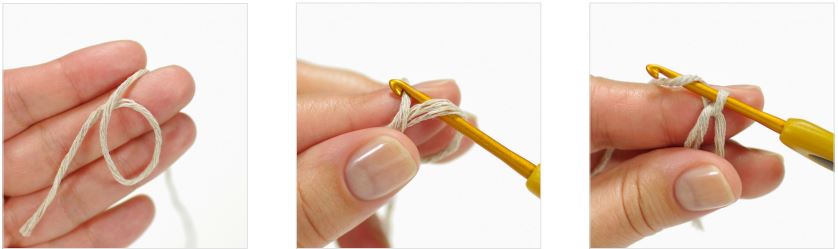
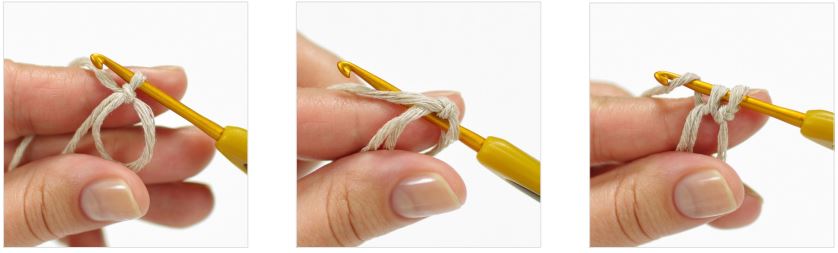
MAGIC RING
A magic ring is a way to begin crocheting in round by crocheting the first round into an adjustable
loop and then pulling the loop tight. Alternatively you can chain 2 and then crochet the first round into
the second chain from hook.
1. Make a loop about 2 cm / 1”
from the yarn end so the working
yarn goes over the yarn tail.
2. Grab the join between your thumb
and forefinger and insert the hook
through the loop from front to back.
3. Yarn over and pull up a loop.
Yarn over and pull through the
loop on the hook.
4. Pull the yarn tight. This does
not count as the first stitch.
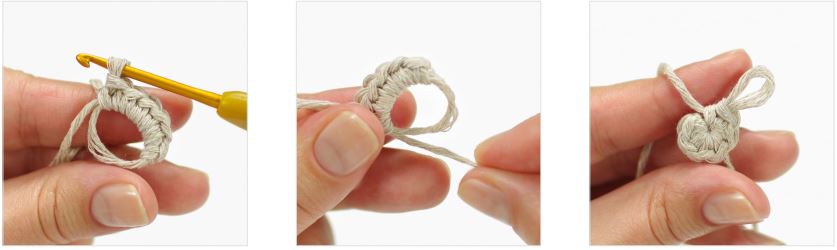
5. Hold the loop between your thumb
and forefinger. Insert the hook
through the loop from front to back.
6. Draw up a loop. Yarn over and
draw through both loops on the
hook, completing the first sc.
7. Continue crocheting through the
loop and over the yarn tail until you
have the required number of sc-s.
8. Hold the last stitch between your
fingers, grab the yarn and pull …
9. … until the center is tightly
closed.
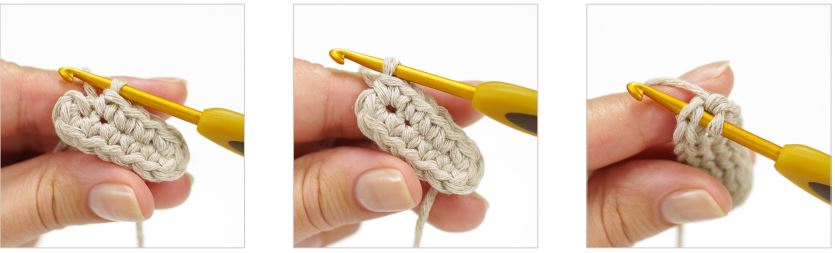
STARTING AN OVAL WITH A CHAIN
Use a chain as a base for an oval piece by crocheting the first row around the starting chain. Example:
1: ch 6, 2 sc in second ch from hook, sc 3, 4 sc in first ch. Rotate and work into the chain from the other
side: sc 3, 2 sc in last ch (16)
1. Chain six. This will be the base
for the first round.
2. Insert the hook into the second
chain from hook.
3. Crochet two single crochet
stitches into this chain.
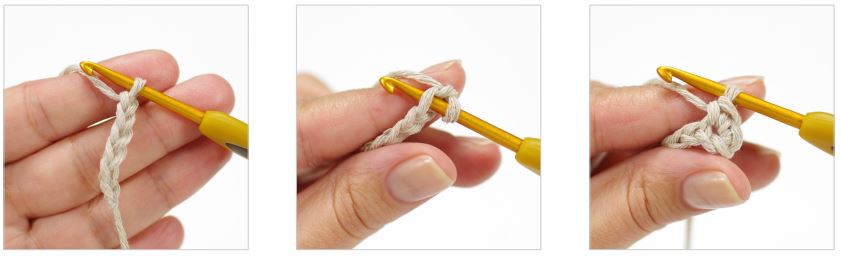
4. Crochet one single crochet
stitch in next three chains.
5. Crochet four single crochet
stitches in the first chain.
6. Rotate and work into the chain
stitches from the other side.
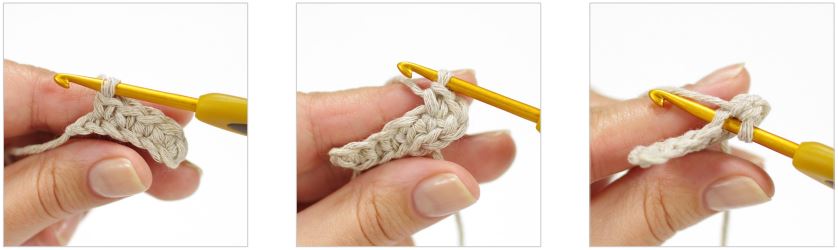
7. Crochet one single crochet
stitch in next three chains.
8. Crochet two single crochet
stitches in the last chain (total of
four stitches in this stitch).
9. Insert the hook in the first stitch
to join the round or start a new
round when crocheting in spiral.
INVISIBLE SINGLE CROCHET DECREASE
Pick up the front loops of both stitches and crochet one single crochet stitch into the loops.
Alternatively you can replace it with a regular single crochet decrease.
1. Insert the hook under the front loop of the first single
crochet stitch.
2. Insert the hook under the front loop of the second
stitch and pick it up onto the hook.
3. Yarn over and draw through both loops on the hook.
Yarn over …
4. … and draw through both loops on the hook,
completing the single crochet stitch.
FINISHING AN OPEN PIECE
1. Finish the last stitch and then slip stitch in the next
stitch.
2. Cut the yarn and fasten off.
3. Insert your hook through the next stitch, front to back.
4. And draw the yarn tail through. If you want to use
the yarn tail for sewing, stop here.

5. Go through the next stitch, back to front.
6. And draw the yarn tail through. Now you can hide it
inside the piece.
SEWING AN OPEN PIECE TO A CLOSED PIECE WITH WHIP STITCH
When you finish the open piece, leave a long yarn tail for sewing, and then fasten off.
1. Thread the yarn tail onto a needle. Insert the needle
below the yarn tail and bring it up under the next stitch.
2. Draw the stitch tight.
3. Go through the next stitch front to back, inserting the
needle under both loops.
4. Go back into the same hole you brought the yarn
up last time and bring it up under the next stitch.
Draw the stitch tight.
5. Or you can go through the stitch back to front,
inserting the needle under both loops.
6. Draw the yarn through.
7. Go back into the same hole you brought the yarn up
last time and bring it up under the next stitch. Draw the
stitch tight.
8. Keep stitching, repeating steps 3 – 4 or 5 – 7 and go
all around the open piece.
FASTENING AND HIDING YARN TAILS
The quickest way to hide yarn tails is to just weave it through the stuffing a couple of times, going in
different directions. But if you want to make it extra secure, you can tie the yarn around one of the
loops of a stitch and then hide it inside the piece.
1. Bring the yarn up through a hole
in the fabric.
2. Insert the needle under one
loop of a stitch right next to the
hole.
3. Pull until you have a small loop.
4. Knot the loop and yarn together,
making a double knot. Do not push
the first knot too close to the fabric.
5. Cut off the loop end. 6. Insert the needle into the same
hole, going up and through the
piece.
7. Pull lightly until the knot disappears
into the fabric.
8. Cut off the yarn close to the fabric.
9. Yarn tail will completely
disappear into the fabric.