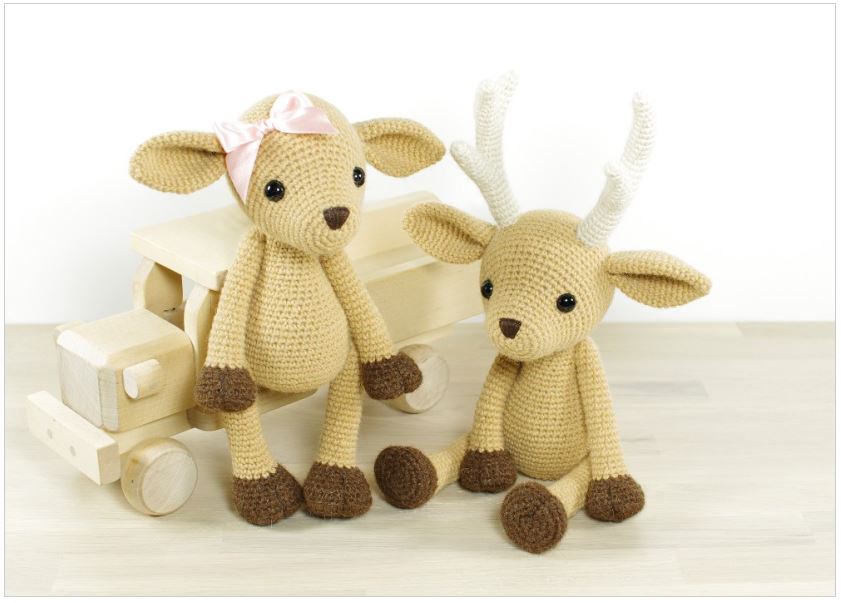
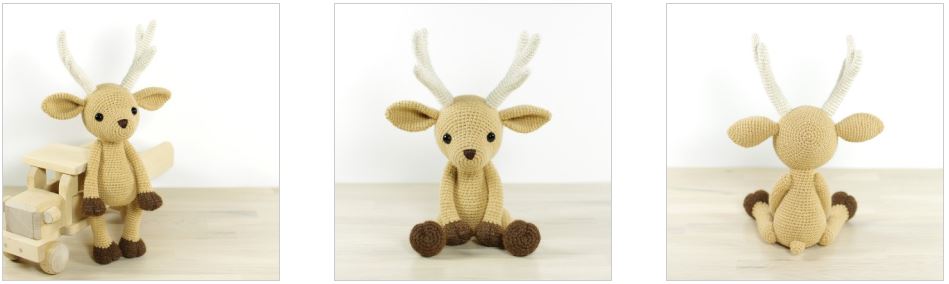
Deer
Crochet pattern by Kristi Tullus
Size
27cm (10 2/3″) from head to toe, with DK weight alpaca wool and a 2,50mm hook.
Skills required
Crocheting in spiral, slip stitch, single crochet stitch, increasing and decreasing.
Difficulty
3. Intermediate – includes some less common crochet techniques and color changes.
Contact Info
Pattern includes unlimited support from me over email or Skype. Crochet photo and
video tutorials and helpful tips are available on my website.
Tip! You can use the same pattern to make larger or smaller toys by using finer or bulkier yarn. Make
sure to pick a crochet hook at least a size smaller than suggested on the yarn label and crochet tightly
enough to achieve a tight gauge that will not allow the stuffing to show through the fabric. You may
also need to adjust the size of the safety eyes, nose and joints.
Materials & Tools
• Yarn. I used DK weight alpaca yarn, 100 m=50g (109 yd=50 g) / 8 ply / 11 wpi / 3: light. You will need
about 95g of beige, 15g of brown and 10g of white yarn.
• 2,50 – 3,50mm crochet hook (US size 2/C – 4/E) or according to the yarn.
• Polyester fiberfill, wool, wadding for stuffing.
• 12mm (1/2″) safety eyes or buttons, beads, felt etc.
• Two 20mm (3/4”) and two 15mm (3/5”) doll joints or safety eyes or buttons and thread.
• Embroidery floss.
• Yarn needle, scissors, stitch marker.
Choosing joints
Tip! You can use plastic doll joints, cotter pin joints, buttons and thread or even just thread to attach
the arms and legs. My favorite are plastic doll joints – they are easy to install, durable and washable.
Buttons and thread will work great as well, if you can’t get your hands on any joints.
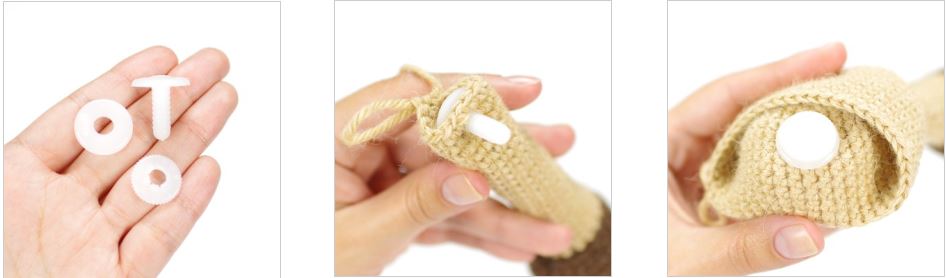
Plastic doll joints
| 1. Plastic doll joints come in three pieces – disk with a stem, washer and a fastener. |
2. Disk with a stem is placed inside the limbs, pushing the stem through the fabric. |
3. And then locked to place inside the body. |
Button and thread joints
Tip! Make sure you use a very strong thread to attach the limbs – it will have to endure quite a bit of
tension and can be a bit difficult to mend, should it break. I have found cotton embroidery floss, nylon
sewing thread (doubled or tripled) or fishing line work really well.
| 1. Cut a length of yarn and draw it through the holes in the button. |
2. Place the button inside a limb, drawing the yarn tails through the fabric. |
3. Place the other button inside the body, draw the yarn tails through the holes and knot them together. |
Abbreviations
• st(s) = stitch(es).
• mr, sc n = crochet n (number) single crochet stitches in to the adjustable loop (see page 14).
• ch = chain stitch.
• sl st = slip stitch (single crochet stitch in UK and Australia).
• sc = single crochet stitch (double crochet stitch in UK and Australia).
• sc (or sl st, ch, hdc etc.) n = make n single crochet stitches (or sl st, ch, hdc etc.), one in each stitch.
• inc = increase – crochet two single crochet stitches in the same stitch.
• dec = decrease – crochet two stitches together using the invisible decrease method (see page 15).
• (sc 4, inc) x n = repeat the pattern between parentheses n times.
• (36) = number of stitches in a round after finishing round.
Notes
• Work in a continuous spiral, do not join rounds or turn your work, unless instructed otherwise in the
pattern.
• Work all stitches in both loops, unless instructed otherwise in the pattern.
• Make sure to crochet tightly enough to achieve a tight gauge that will not allow the stuffing to show
through the fabric.
• Use a stitch marker or a piece of yarn to mark the end or the beginning of a round. Move the
marker up after completing each round.
Head
With beige yarn:
| 1: mr, sc 6 2: inc x 6 3: (sc, inc) x 6 4: (inc, sc 2) x 6 5: (sc 7, inc) x 3 6: sc in each st 7: sc 3, inc, (sc 8, inc) x 2, sc 5 8: sc in each st 9: (sc 9, inc) x 3 10: sc in each st 11: sc 4, inc, (sc 10, inc) x 2, sc 6 |
(6) (12) (18) (24) (27) (27) (30) (30) (33) (33) (36) |
On round 12 place a stitch marker in the 22nd stitch
to mark the center of the face.
| 12: sc 2, inc, (sc 5, inc) x 5, sc 3 13: (sc 6, inc) x 6 14: sc 19, inc, sc 7, inc, sc 20 15: sc 21, inc, sc 5, inc, sc 22 16: (sc 25, inc) x 2 17: sc 23, inc, sc 4, inc, sc 25 |
(42) (48) (50) (52) (54) (56) |
Attach safety eyes between rows 12 and 13, leaving
14 stitches (count 13 holes) between them (see page 7).
Add a bit of stuffing to the muzzle and embroider the
nose (see page 7 – 8).
| 18-25: sc in each st 26: sc 5, dec, (sc 12, dec) x 3, sc 7 27: (sc 11, dec) x 4 28: sc 4, dec, (sc 10, dec) x 3, sc 6 |
(56) (52) (48) (44) |
Start stuffing the head. Keep adding a bit of fiberfill
after every few rounds, stuffing the head firmly.
| 29: (sc 9, dec) x 4 30: sc 3, dec, (sc 8, dec) x 3, sc 5 31: (sc 7, dec) x 4 32: sc 2, dec, (sc 6, dec) x 3, sc 4 33: (sc 5, dec) x 4 34: (dec, sc 2) x 6 35: (sc, dec) x 6 36: dec x 6 |
(40) (36) (32) (28) (24) (18) (12) (6) |
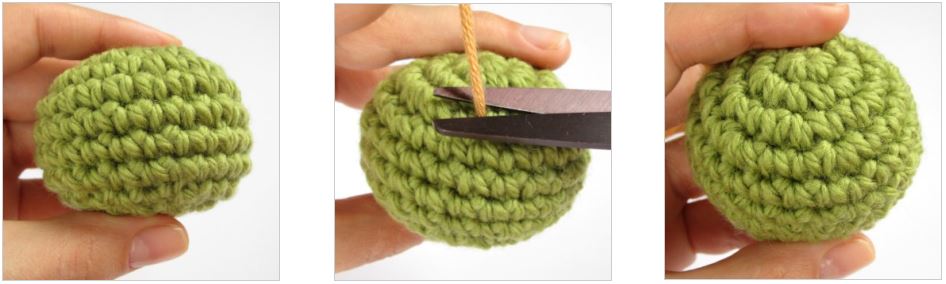
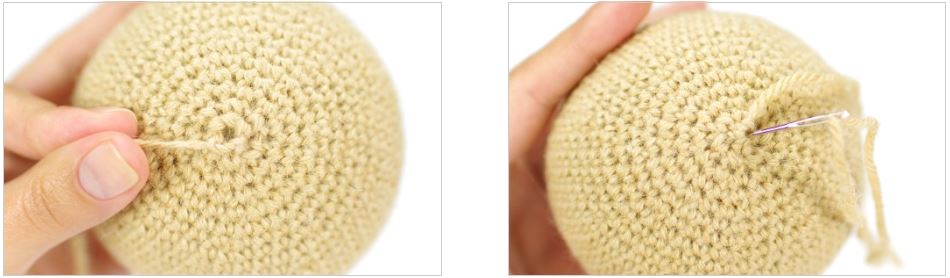
Finish stuffing the head. Cut the yarn, leaving a long
yarn tail, and fasten off. Pick up all the remaining
stitches and close the opening (see page 8).
Ears (make 2)
With beige yarn:
| 1: mr, sc 6 2: (inc, sc) x 3 3: (sc 2, inc) x 3 4: sc, inc, (sc 3, inc) x 2, sc 2 5: (sc 4, inc) x 3 6: sc 2, inc, (sc 5, inc) x 2, sc 3 7: (sc 6, inc) x 3 8: (sc 11, inc) x 2 9: sc 5, inc, sc 12, inc, sc 7 10-15: sc in each st 16: (dec, sc 12) x 2 17: (dec, sc 11) x 2 18: (dec, sc 4) x 4 |
(6) (9) (12) (15) (18) (21) (24) (26) (28) (28) (26) (24) (20) |
Sl st in next. Cut the yarn, leaving a long yarn tail for
sewing, and fasten off. Do not stuff the ears.
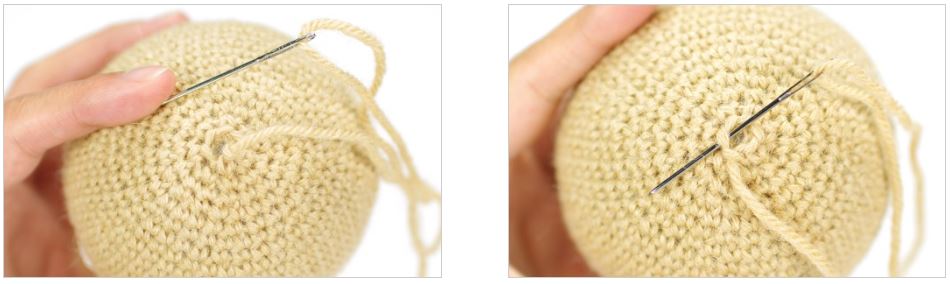
Antlers (make 2)
Make the three tines first and then join them as you
go (see page 9 – 10).
Tine 1
With white yarn:
| 1: mr, sc 6 2-4: sc in each st 5: sc 3, inc, sc 2 6: sc in each st 7: sc 4, inc, sc 2 8: sc in each st 9: sc 4, leave rest of the sts unworked Sl st in next stitch and fasten off. Stuff firmly. |
(6) (6) (7) (7) (8) (8) (8) |
Tine 2
With white yarn:
| 1: mr, sc 6 2-3: sc in each st |
(6) (6) |
| 4: sc 3, inc, sc 2 5: sc in each st 6: sc 4, inc, sc 2 7-8: sc in each st 9: sc 4, leave rest of the sts unworked Sl st in next stitch and fasten off. Stuff firmly. |
(7) (7) (8) (8) (8) |
Tine 3
With white yarn:
| 1: mr, sc 6 2-3: sc in each st 4: sc 3, inc, sc 2 5-6: sc in each st |
(6) (6) (7) (7) |
Do not fasten off, leave the working yarn attached to
the third tine. Stuff firmly.
Antler
With white yarn:
1: continue around the third tine: sc, take (14)
the second tine and continue around it,
starting in the next stitch after the sl st:
sc 8, continue around the third tine,
starting in the next stitch: sc 2, dec, sc 2
| 2: dec, sc 6, dec, sc 4 3: (dec, sc 4) x 2 4: sc in each st |
(12) (10) (10) |
Start stuffing the antler. Keep adding a bit of fiberfill
after every few rounds, stuffing the antler firmly.
| 5: sc 7, dec, sc 6-7: sc in each st 8: sc 4, take the first tine and continue around it, starting in the next stitch after the sl st: sc 8, continue around the antler, starting in the next stitch: sc 5 9: sc 3, dec, sc 6, dec, sc 4 10: sc, dec x 2, sc 3, dec x 2, sc 3 11-12: sc in each st 13: dec, sc 9 |
(9) (9) (17) |
| (15) (11) (11) (10) |
14-18: sc in each st (10)
Sl st in next stitch. Cut the yarn, leaving a long yarn
tail for sewing, and fasten off. Stuff firmly.
Arms (make 2)
With brown yarn:
| 1: mr, sc 6 2: inc x 6 3: (sc, inc) x 6 4: (inc, sc 2) x 6 |
(6) (12) (18) (24) |
Crochet round 5 in back loops only.
| 5: sc in each st 6: sc 7, dec, (sc 2, dec) x 2, sc 7 7: sc 8, dec, sc, dec, sc 8 8: (sc 5, dec) x 2, sc 5 9: dec, sc 6, dec, sc 7 |
(24) (21) (19) (17) (15) |
Stuff firmly. Make a long vertical stitch along the front
of the hoof and draw it tight (see page 10 – 11).
Keep adding a bit of fiberfill after every few rounds,
stuffing the arms firmly.
With beige yarn:
| 10: sc 7, dec, sc 6 11: sc in each st 12: sc 7, dec, sc 5 13-14: sc in each st 15: sc 7, dec, sc 4 16-17: sc in each st 18: sc 7, dec, sc 3 19-30: sc in each st |
(14) (14) (13) (13) (12) (12) (11) (11) |
On the left arm only, sc in next 6 stitches. Count the
last stitch as the end of the round from now on.
Attach the joint between rows 29 and 30, placing it so
the stem is facing straight towards the body (see
page 11).
31: sc, dec x 5 (6)
Finish stuffing the arms. Cut the yarn, leaving a long
yarn tail, and fasten off. Pick up all the remaining
stitches and close the opening (see page 8).
Legs (make 2)
With brown yarn:
| 1: mr, sc 6 2: inc x 6 3: (sc, inc) x 6 4: (inc, sc 2) x 6 5: (sc 3, inc) x 6 |
(6) (12) (18) (24) (30) |
Crochet round 6 in back loops only.
| 6: sc in each st 7: sc 8, dec, (sc 2, dec) x 3, sc 8 8: sc 9, dec, (sc, dec) x 2, sc 9 9: sc 5, dec, sc 9, dec, sc 5 10: dec, sc 8, dec, sc 9 |
(30) (26) (23) (21) (19) |
Stuff firmly. Make a long vertical stitch along the front
of the hoof and draw it tight (see page 10 – 11).
Keep adding a bit of fiberfill after every few rounds,
stuffing the legs firmly.
With beige yarn:
| 11: sc 6, dec, sc 3, dec, sc 6 12: sc 8, dec, sc 7 13: sc in each st 14: sc 8, dec, sc 6 15-16: sc in each st 17: sc 8, dec, sc 5 18-32: sc in each st |
(17) (16) (16) (15) (15) (14) (14) |
On the left leg only, sc in next 7 stitches. Count the
last stitch as the end of the round from now on.
Attach the joint between rows 31 and 32, placing it so
the stem is facing towards the body (see page 11).
| 33: sc 2, dec, sc 7, dec, sc 34: dec x 6 |
(12) (6) |
Finish stuffing the legs. Cut the yarn, leaving a long
yarn tail, and fasten off. Pick up all the remaining
stitches and close the opening (see page 8).
Body
With beige yarn:
| 1: mr, sc 6 2: inc x 6 |
(6) (12) |
| 3: (sc, inc) x 6 4: (inc, sc 2) x 6 5: (sc 3, inc) x 6 6: sc, inc, (sc 4, inc) x 5, sc 3 7: sc 3, inc, (sc 8, inc) x 3, sc 5 8: (sc 9, inc) x 4 9-16: sc in each st |
(18) (24) (30) (36) (40) (44) (44) |
Turn the body so the end of the round is at the center
of the back. Attach the legs to the sides of the body,
between rounds 9 and 10 (see page 12).
| 17: (sc 9, dec) x 4 18: sc 3, dec, (sc 8, dec) x 3, sc 5 19: (sc 7, dec) x 4 20: sc in each st 21: (dec, sc 14) x 2 |
(40) (36) (32) (32) (30) |
Start stuffing the body. Keep adding a bit of fiberfill
after every few rounds, stuffing the body firmly.
| 22: sc in each st 23: sc 12, dec, sc 4, dec, sc 10 24: sc in each st 25: (dec, sc 5) x 4 26: sc in each st 27: sc 9, dec, sc 4, dec, sc 7 28: sc in each st 29: sc 5, dec, sc 9, dec, sc 4 30-33: sc in each st |
(30) (28) (28) (24) (24) (22) (22) (20) (20) |
34: sc 5, leave rest of the sts unworked (20)
Sl st in next stitch. Cut the yarn, leaving a long yarn
tail for sewing, and fasten off.
Attach the arms to the sides of the body, between
rounds 29 and 30 (see page 12). Finish stuffing.
Tail
With beige yarn:
| 1: mr, sc 6 2: (sc 2, inc) x 2 3: sc, inc, sc 3, inc, sc 2 4: sc in each st 5: (dec, sc 3) x 2 |
(6) (8) (10) (10) (8) |
Sl st in next stitch. Cut the yarn, leaving a long yarn
tail for sewing, and fasten off. Do not stuff the tail.
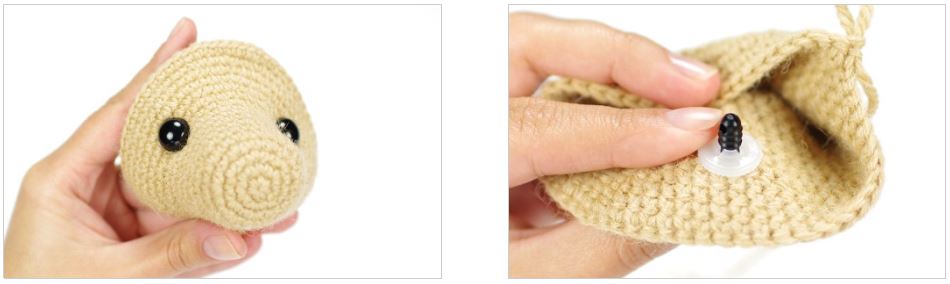
Head
a) Attach safety eyes after finishing round 17.
| 1. Place the eyes to either side of the stitch marker, between rows 12 and 13, leaving 14 stitches (count 13 holes) between them. |
2. Make sure you are satisfied with the placement of the eyes before pushing the washer into place. |
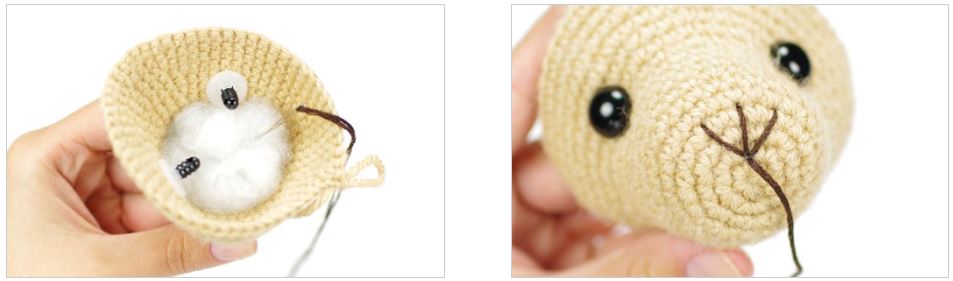
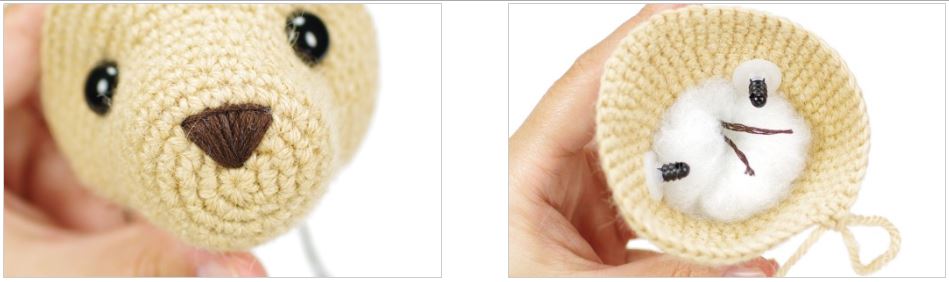
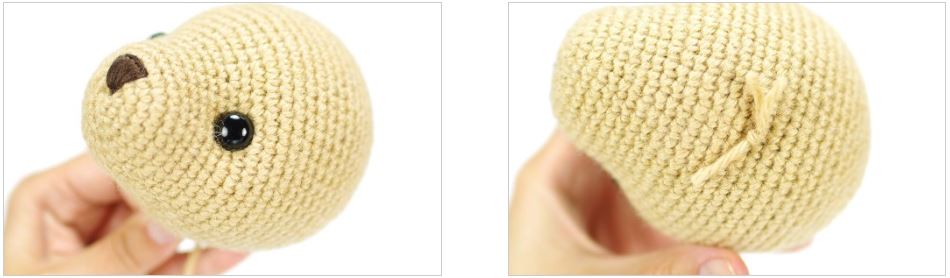
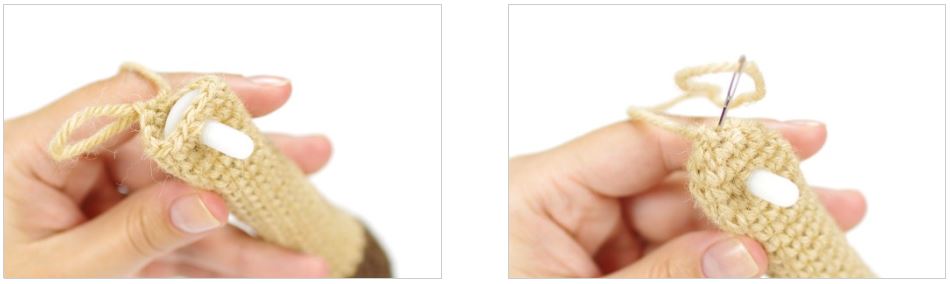
b) Embroider the nose.
| 1. Add a bit of stuffing to the muzzle. Insert the needle from inside the head and bring it up just above the first round. |
2. Make a few stitches to mark the shape and size of the nose. |
| 3. Just keep stitching, trying to keep even tension … | 4. … and fill in all the gaps. |
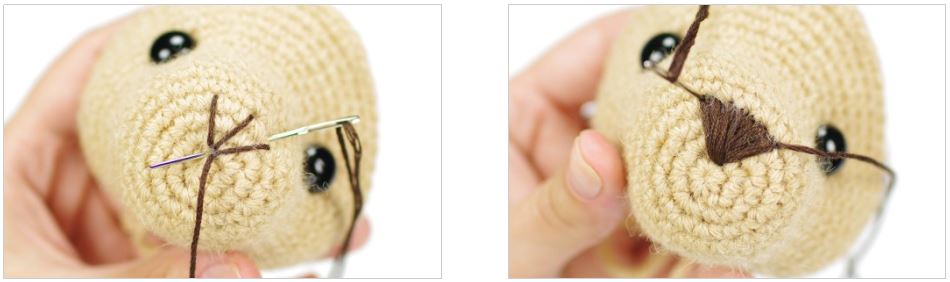
| 5. Make a long stitch across the top of the nose to hide any imperfections. |
6. Knot the yarn ends together inside the head. |
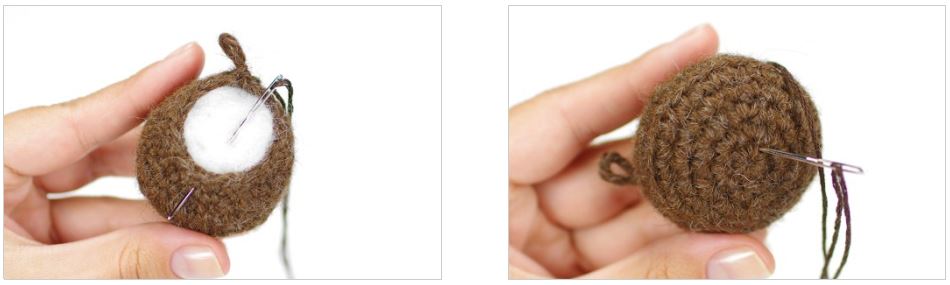
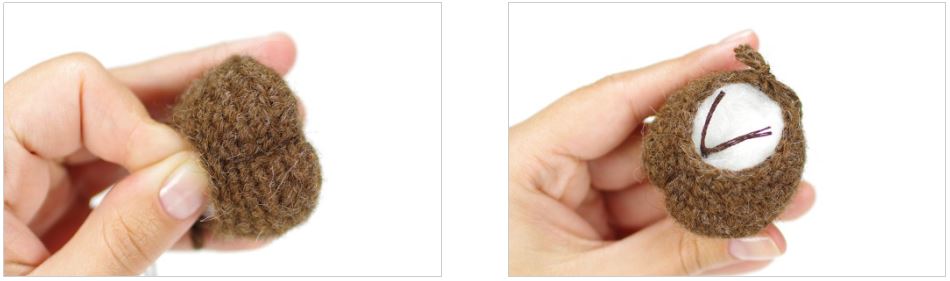
c) Finish the head and close the opening.
| 1. Cut the yarn, leaving a long tail, and fasten off. Thread the yarn tail onto a yarn needle. |
2. Pick up all the remaining stitches onto the yarn, inserting the needle from the center and under the front loop only and draw the yarn through. |
| 3. Grab the yarn tail and pull until the hole is tightly closed. |
4. Insert the needle through the center and bring the yarn to the side of the head. Fasten and hide the yarn tail. |
d) Use yarn to shape the head.
| 1. Insert the needle from the bottom of the head, between rounds 16 and 18, and bring it up right next to the eye. |
2. Go about half way around the eye and insert the needle right next to the eye. Bring it to the bottom of the head. |
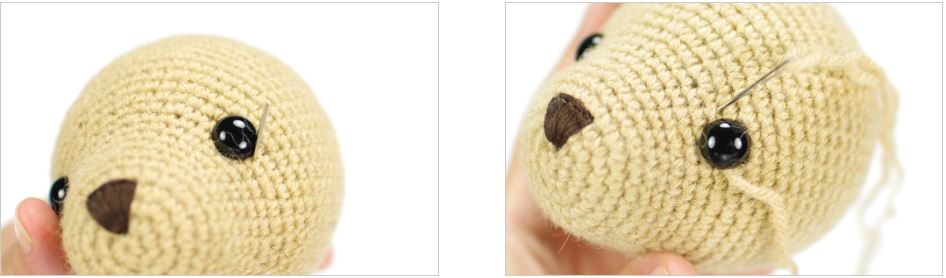
| 3. Grab the yarn tails and tug gently, pulling the eye in just a bit. |
4. Knot the yarn tails together. Do the same with the other eye. |
Antlers
a) Make the three tines first and then join them as you go.
| 1. Take the third tine and continue around it, crocheting one sc in next stitch. |
2. Take the second tine and continue around it, starting in the next stitch after the slip stitch. |
| 3. Go around the second tine, crocheting one sc in each stitch. |
4. Continue around the third tine, starting in the next stitch. |
| 5. Go around the third tine: sc 2, dec, sc 2. Continue crocheting in spiral. |
6. Join the first tine the same way. |
Arms & Legs
a) Make a long stitch along the front of the hoofs.
| 1. Finish the hoof and stuff it firmly. Insert the needle from the top, leaving a short yarn tail, and bring it up between the last two rounds. |
2. Go straight down and insert the needle just above the first round. |
| 3. Come back out through the opening. Grab the yarn tails and draw the stitch very tight. |
4. Knot the yarn ends together. |
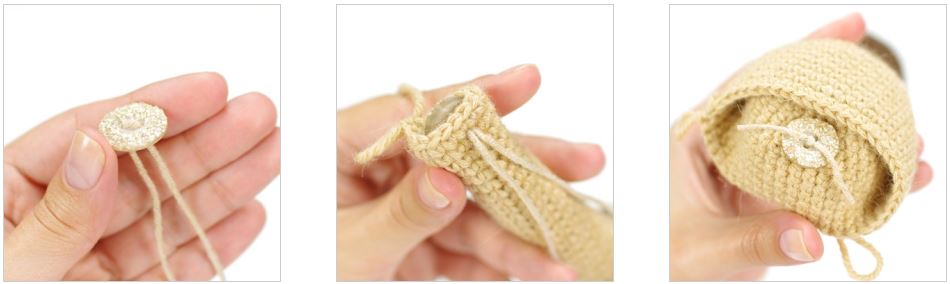
b) Place the disk with a stem or a button inside the arms and legs.
| 1. Place the disk inside the limb so the stem is facing straight towards the body. |
2. Finish the arms and legs and close the opening (see page 8). |
Assembling the deer
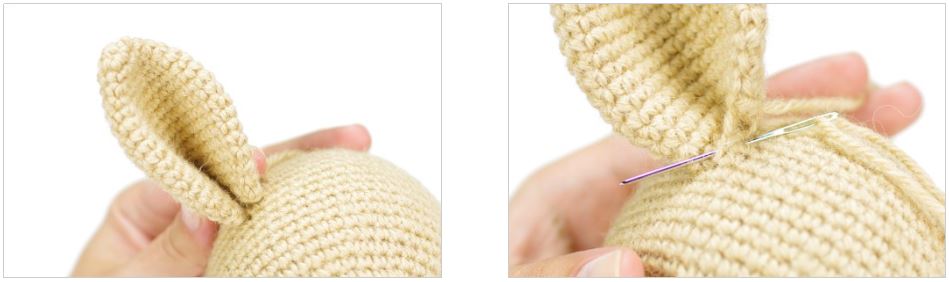
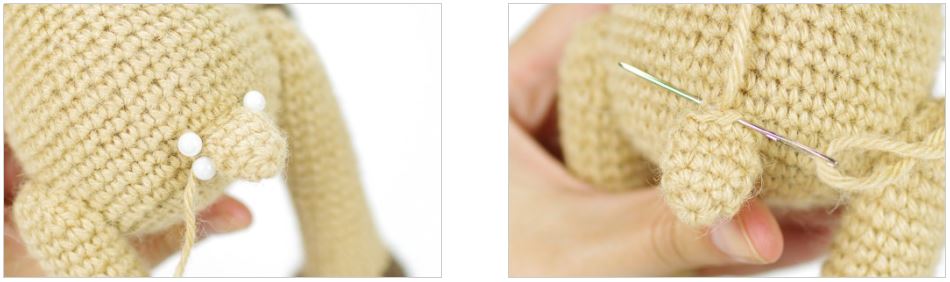
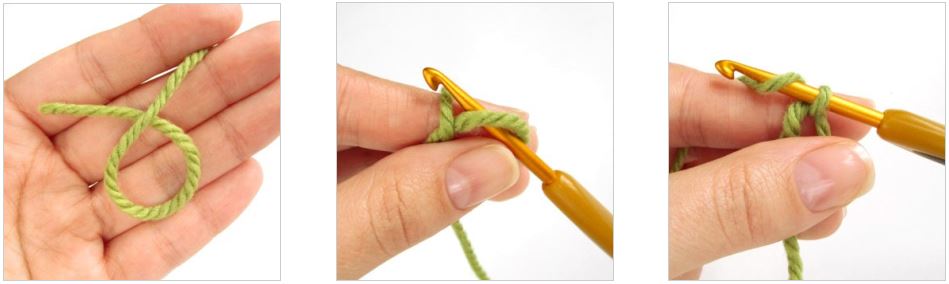
a) Sew the ears to the head.
Tip! Sew the ears and antlers to the head before you sew the head to the body – this way you can
fasten all yarn tails securely with a knot under the head.
| 1. Place the ears just behind round 21 of the head, leaving 21 – 22 stitches between them. |
2. Flatten the ear and start sewing it to the head. |
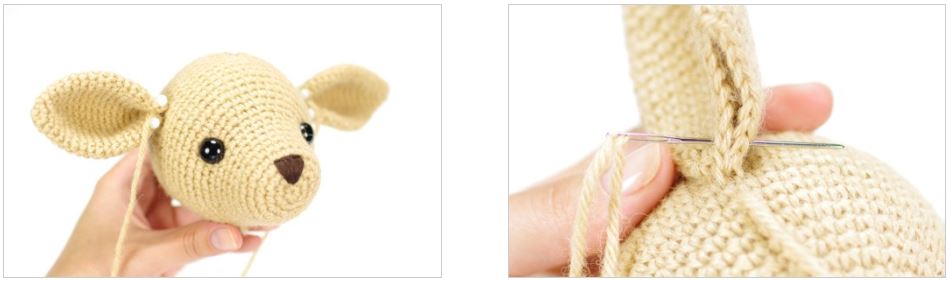
| 3. When you reach the center, fold the ear in half. | 4. And sew the second side right next to the first. |
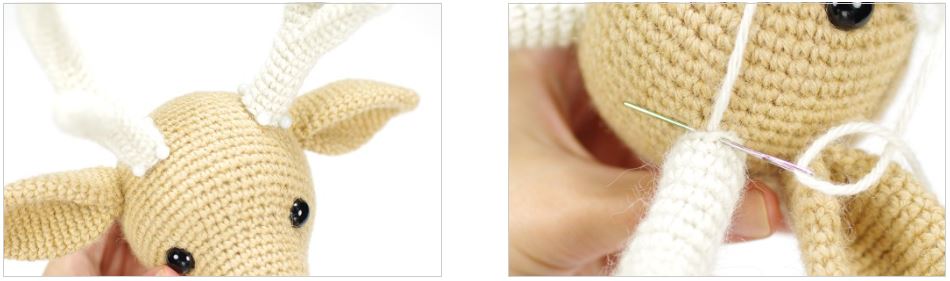
b) Sew the antlers to the head.
| 1. Place the antlers just behind round 21 of the head, leaving 10 – 11 stitches between them. |
2. Sew the antlers to the head (see page 16). |
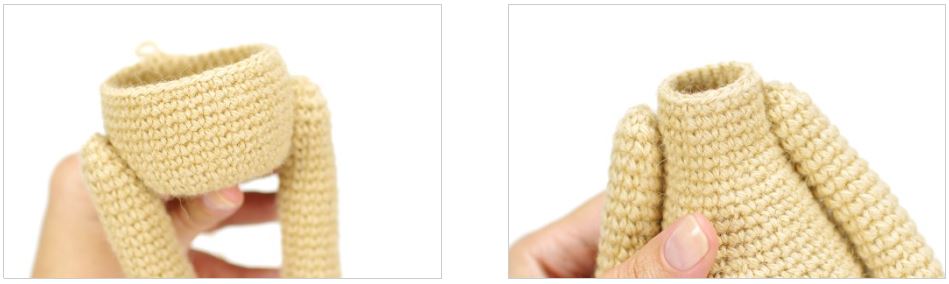
c) Finish the arms and legs. Start making the body and attach the limbs as you go.
| 1. Turn the body so the end of the round is at the center of the back. Attach the legs to either side of the body between rounds 9 and 10. |
2. Finish the body. Attach the arms to either side of the body between rounds 29 and 30. |
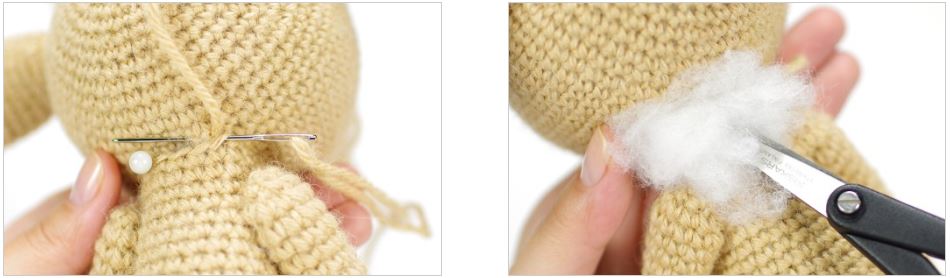
d) Sew the head to the body.
| 1. Sew the head to the body (see page 16), placing it so the front edge is just behind round 15 of the head. |
2. Add a bit more stuffing before closing the seam. |
e) Sew the tail to the body.
| 1. Flatten the tail and place it over the 8th round of the body. |
2. Sew the tail to the body. |
Amigurumi Essentials
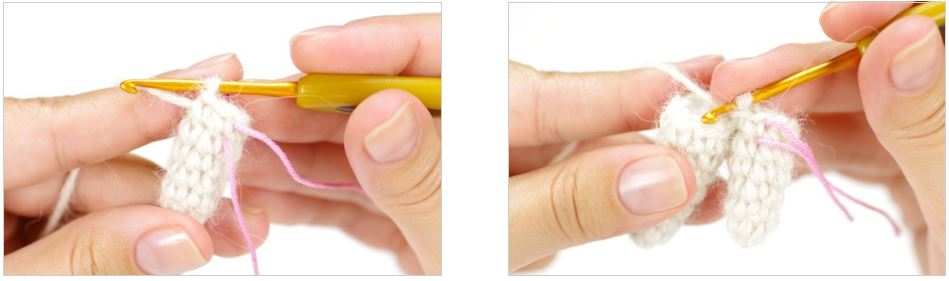
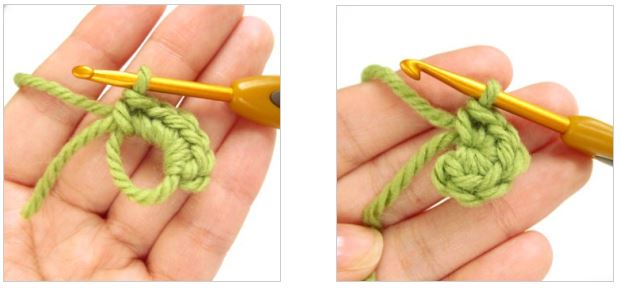
Magic Ring
A magic ring is a way to begin crocheting in round by crocheting the first round in to an adjustable
loop and then pulling the loop tight. Alternatively you can chain 2 and then crochet the first round into
the second chain from hook.
| 1. Make a loop an inch from the yarn end. Grab the join with your thumb and forefinger. |
2. Insert the hook through the loop from front to back, yarn over and draw up a loop. |
3. Yarn over and draw through the loop. |
| 4. Pull the yarn tight. This does not count as the first single crochet stitch. |
5. Start the first sc. Insert the hook through the starting loop from front to back. |
6. Draw up a loop. Yarn over and draw through both loops. |
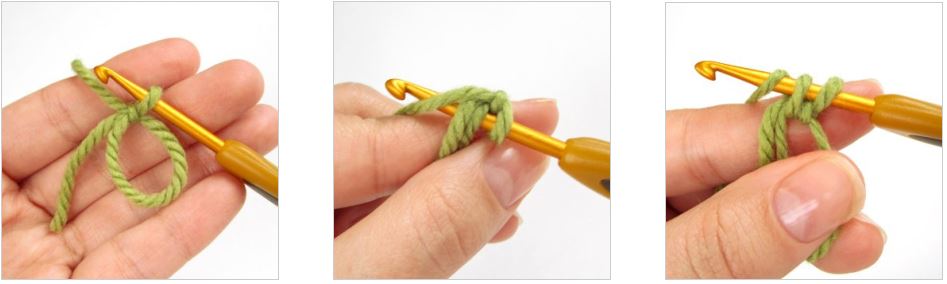
| 7. Continue crocheting over the loop and the yarn tail until you have the required number of sc-s for the first round, usually six. |
8. Grab hold of the yarn tail and pull until the center is tightly closed. |
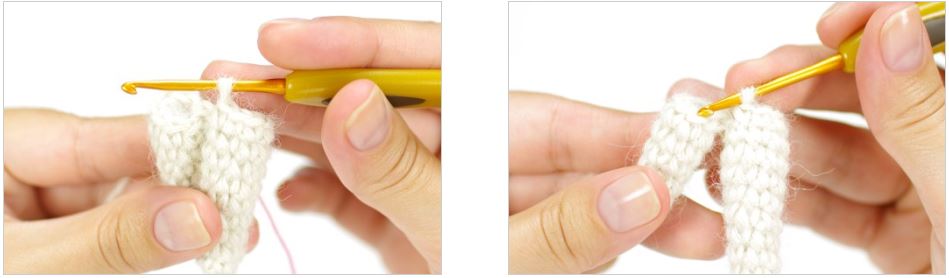
Invisible decrease
Tip! Alternatively, you can use the regular single crochet decrease – insert the hook through the first
stitch and draw up a loop, insert the hook through the second stitch and draw up a loop, yarn over
and draw through all loops on the hook.
| 1. Insert the hook under the front loop of the first single crochet stitch. Do not yarn over. |
2. Insert the hook under the front loop of the second stitch and pick it up onto the hook. |
3. Yarn over and draw through the first two loops. Yarn over and draw through all loops. |
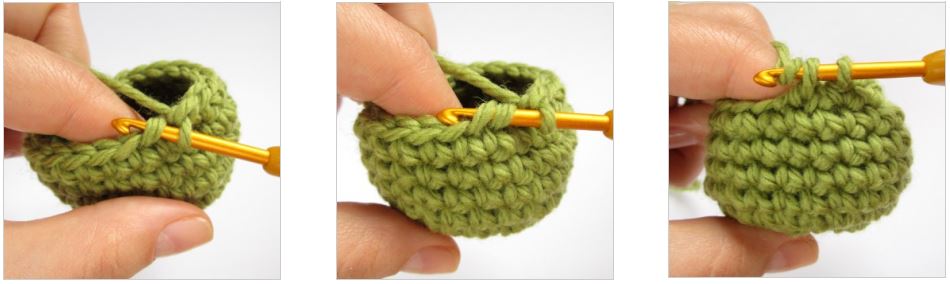
Changing yarn
| 1. Stop before the last step of the last single crochet stitch with the “old” yarn. |
2. Tie the “new” yarn around the “old” yarn and push the knot close to the piece. Cut the “old“ yarn and tie the yarn tails together |
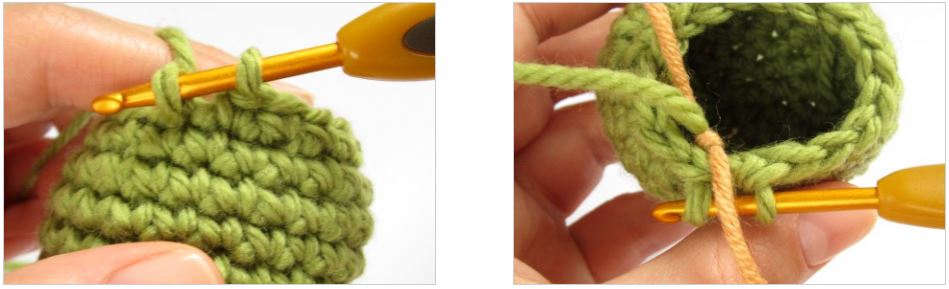
| 4. Pick up the “new” yarn and draw through both loops. Continue crocheting with the “new” yarn. |
5. There will be a jolt where the yarn is changed and the stripes will not line up. |
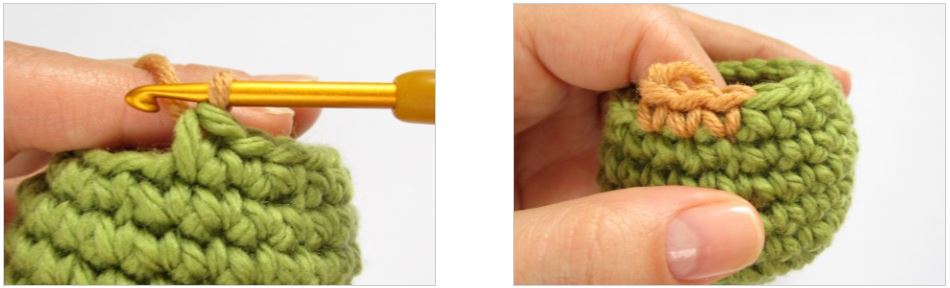
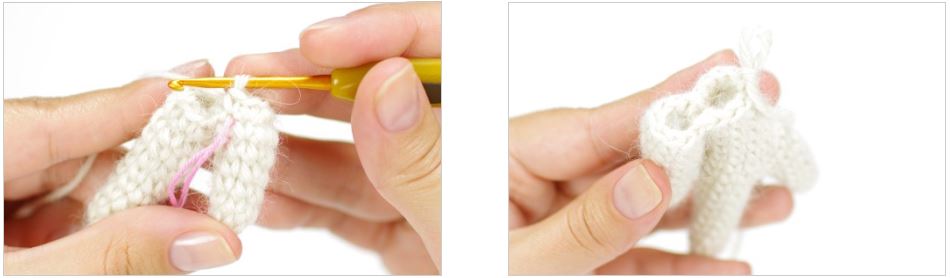
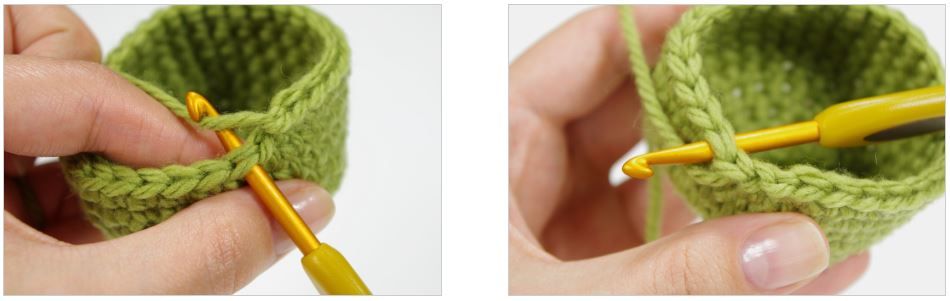
Finishing an open piece
| 1. Crochet a slip stitch in next stitch. | 2. Cut the yarn. Pull on the loop until the yarn tail comes through the stitch. |
| 3. Insert the hook through the next stitch from front to back and draw the yarn tail through. |
4. Insert the hook through the next stitch from back to front and draw the yarn tail through. |
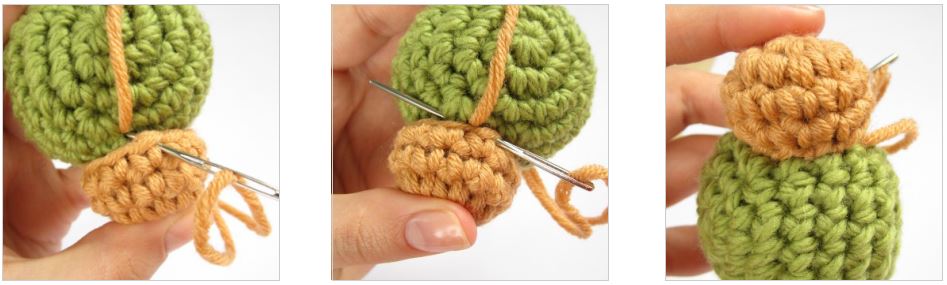
Sewing an open piece to a closed piece with whip stitch
| 1. Bring the needle up through the fabric under a stitch of the open piece. Go down through both loops of the stitch and into the same hole. |
2. Bring the needle back up directly under the next stitch. |
3. Draw the yarn tight after every stitch. Make sure your stitches are parallel to one another. |
Fastening with a knot and hiding the yarn tail
This tutorial will show how to knot the yarn tail and hide it inside a piece. This method can be used
when the yarn tail and the main piece are the same color.
| 1. Bring the yarn up through the fabric after you have finished sewing. |
2. Insert the needle under one loop of a stitch right next to the hole. |
3. Pull until you have a small loop. |
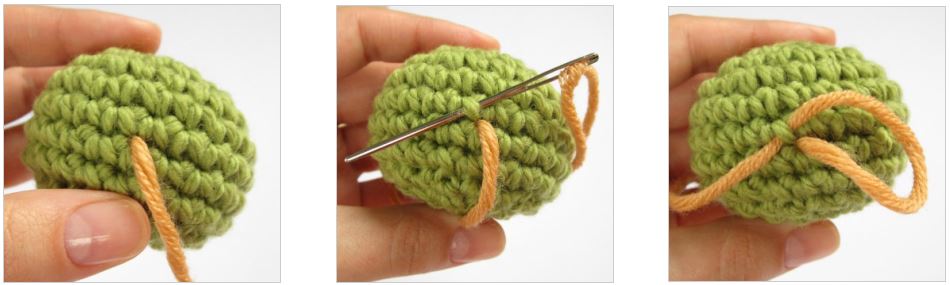
| 4. Make a double knot. Do not push the first knot close to the fabric. |
5. Cut off the loop end. | 6. Insert the needle into the same hole, going up and through the piece. |
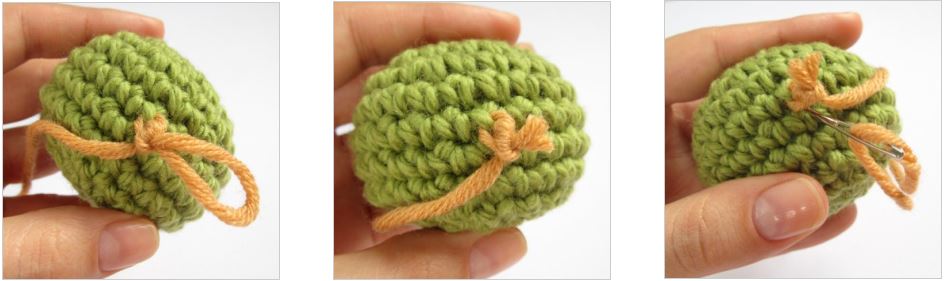
| 7. Pull lightly until the knot disappears into the fabric. |
8. Pull lightly on the yarn tail and cut it off close to the fabric. |
9. Yarn tail will completely disappear into the fabric |